Sunday, September 29, 2013

Folded Leather Clutch

This is one of those posts that is really about me recording what I did so I can remember it in the future, but you guys might like it too :-)

I had a couple hours to myself today and wanted to sew, but having finished my Archer the other day, I didn't really feel like starting a new garment.  I've had lots of ideas for leather bags swimming around in my head, so I decided to finally get around to making one. 

I've had a very fruitful Leather Acquisition Period lately.  The most recent pieces I bought were at the Textile Discount Outlet here in Chicago.  Last Sunday I went over there with a group of other Chicago sewing and knitting bloggers; of course, I forgot to take any pictures, but the lovely Michelle wrote up a post with pictures and links just a couple days later.  I didn't get inspired by any fabric that day, but I got mightily inspired by the leather.  I came away with a beautiful piece in pale seafoam green with a pearlized finish.  But I couldn't stop thinking about some of the other colors I saw, so a couple days later I went back and picked up burnt orange, naples yellow and navy.  Lucky for me, the outlet is only a couple miles from my house.  Or unlucky, depending on how you look at it!


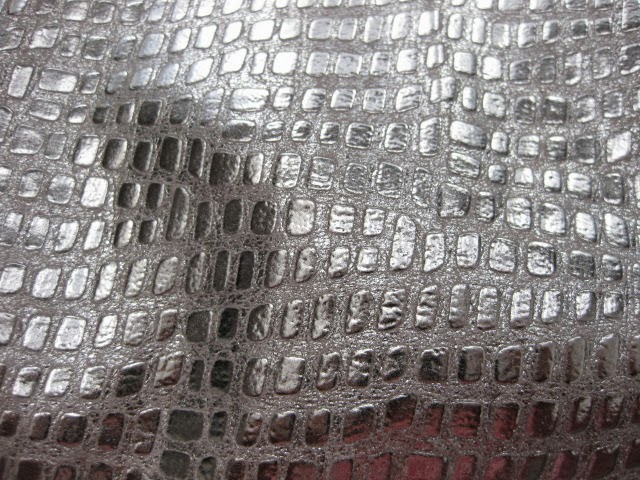
These skins are a little heavier than what I've been sewing with lately, but thinner than the leather I used for my very first clutches.  I'd say the thickness is about twice that of the shiny silver I showed you last week.  Since I hadn't sewn with this thickness before, I decided to make a very simple almost-square foldover bag, and give it a tassel at the zipper.  I also decided to start with my least favorite of the colors, just in case!  This navy is really murkier than I'd like, but I guess it's a good navy for fall.


I used a nylon zipper because I love all the colors they come in and I hate metal zippers!  I always end up gouging nicks into my fingernails when reaching into a bag with a metal zipper.  Using a nylon zipper also makes it easier to sew over the zipper end covers, although I forgot to do that!  It was a lucky accident though - I really like how it looks without the stitching, and it's held in place with fusible web.  Time will tell how durable that is, but I can always add some glue if it starts to come up.


I used a variety of techniques from different patterns, tutorials and the Craftsy leather bag class I've mentioned before.  The size of my outer and lining pieces was dictated by the length of the zipper I wanted to use.  This is a 9" zipper, so I cut my leather pieces to 10.5" square, and my lining pieces to 10.5" x 10.25" - the short measurement goes top (zipper edge) to bottom, so there isn't excess bulk at the bottom of the bag when it's turned out.

The linings are interfaced with Shape Flex (Pellon SF101) then stitched to either side of the prepared zipper.  Then I aligned the cut edge of the leather with the zipper teeth and stitched that down.  I would have liked to turn it back but this leather is just too thick for that. 


lining is "Mind's Eye"  from Anna Maria Horner's Field Study line

Finally, I put on my roller foot to stitch the bottom and sides of the leather together.  The roller foot works well with the very thin leathers, but it didn't work here, so I ended switching out to my walking foot and didn't have any more troubles.  I used 1/2" seam allowances throughout and just trimmed the points off the corners.  The finished bag measures 9.5" wide by about 10" tall.  When folded down, it's about 6" x 9.5".  I originally wanted a slightly larger bag but was limited by my supplies; however, I think it turned out to be just the right size!


I used this tutorial for making the tassel - I've used it before and I think it gives quite a nice result. Putting it on a swivel clasp instead of a key ring makes it easily removable.

 
While I love the look of foldover clutches - well, clutches in general - they aren't super practical for me a lot of the time, so future renditions will likely have a strap of some sort.  But I'm pretty happy with this bag for a first go.  Expect to see more of these!


Thursday, September 26, 2013

Lovers' Quarrel

Sergio and I have been having a difference of opinion.  I love soft, silky, lightweight cotton lawns and voiles.  He does not. 

And I really needed him today to finish the seams of my second Archer shirt, which I've slowly been working on over the last several days.  Like a good girl, I did a sample; tension was off.  I adjusted his knobs (double entrendre intended) and tried it again.  And again.  And again and again and again . . . for close to 45 minutes, until I had this:


Talk about frustrating!  No matter what combination I tried, I got pretty much the same result, and the stitching wouldn't even stay consistent along one seam!  I did learn something from all my experimenting though:  I got better results with a three-thread overlock than with four.

My sewjo has been suffering lately (it seems like there's a lot of that going around, too) but things have been going mostly OK with this project.  I hope I didn't just jinx it.  Here's what I've got so far:


After I made the first Archer, I thought a LOT about the fit.  I scoped out ladies on the street who were wearing buttoned shirts, to see how theirs fit.  And then I decided to listen to those of you who said, "It's fine - leave it."  The only thing I did differently this time was to change the spacing of the buttonholes, from 3.5" apart to 2.5" apart, in order to fix the gap-osis I had with the first one.  This gave me an extra button or two down the front.  I hope it works - making the buttonholes is one of the first things I do when I make a shirt.  I might want to rethink that if this spacing is off.

Here's a better look at the fabric:


This is one of the fabrics from Anna Maria Horner's Little Folks line - I believe this one is Baby Bouquet in Berry.  I love the red, orange and pink against the light blue background.

I'm not really sure where this week has disappeared to, but it hasn't really been to sewing or knitting - I seem to be spending very little time lately on either, hence the lack of posts!  Thankfully, I have plenty of handmade garments to keep me going for quite a while :-)

Saturday, September 21, 2013

Ooooh, shiny!

Last week, my mom asked me to make a bag for my aunt for her birthday.  I can never refuse my mom :-)  After discussing bag style and material options, we decided that I'd make my aunt two bags:  a frame purse to use as an evening bag, and a zipped wristlet to carry when she runs her errands during the day.

My aunt shares my love of all things shiny, so we decided to go with an embossed silver leather skin I've had in my stash for a while:

Oooooh!  Shiny silver crocodile!

Instead of using the pattern I've used for all my other leather clutches, I drew up my own pattern this time.  I wasn't sure what kinds of things my aunt carries with her when she goes out, so I wanted the bag to be a little bigger than the ones I've made before, and I also wanted it to look a little more angular.  When I first finished the bag on Thursday afternoon, I wasn't sure I liked it.  But the more I looked at it the more it grew on me.  I'm now at the point where I think I need to make another for myself!

This photo actually makes the silver look a little understated, if you can believe it!

Here you can see the size difference between this pattern and my old pattern:


It's actually only about an inch deeper, but it makes a big difference.  You can fit a lot of stuff in there.   With my phone, a pen, a lipstick and a hanky, the bag was still relatively flat.  Plenty of room for a couple of candy bars or something!


I took a couple pictures of me carrying it, so you could get an idea of the size.


When sewing up this bag, I used a lot of the tips and tools from Don Morin's Craftsy class, Making Leather Bags.  It really did make things go more smoothly, so if you're interested in sewing with leather, do check out the class!

My mom and her four siblings were all born in Rome, so for the "day" bag I used up the last of my Italy Map fabric - I believe these landmarks are in Rome, but I could be wrong!  My mom and my aunt have both been to Rome (and one of my uncles still lives there), so they will know!   Inside is Va Bene stripe with a pocket in Vespas.


This pattern is the Perfect Zip Bags from Elizabeth Hartman,  but I also incorporated some tricks from Don Morin's article in the current issue of Threads.

And even though my mom wasn't sure if this kind of bag would be useful for her, I made her one anyway, because she's my mom and I love her and I like to make stuff for her.  I used some of (what I consider to be) the most beautiful fabrics in my stash, from the Dear Stella Piper line.   You've seen this fabric before:


And inside are airplanes:

I think these are such pretty fabrics for fall.

I've been experimenting with different interfacings for this type of bag.  For these two bags, I used the stiff woven interfacing for collars.   The bags feel crisp and supple at the same time.  I recently made a couple of very small zippered pouches using "Craft Fuse" and I think I prefer the stiffer feel myself.  For the silver clutch, I used "Shape Flex" for the lining and left the leather un-interfaced, although it is quite thin.

I'm hoping to try out this zipped wristlet pattern using some leather in the near future.  But as usual, too many ideas, and too little time!


Friday, September 20, 2013

Using Every Last Bit

Here's the little tip I mentioned yesterday.  This is a method to figure out how much yarn you need to save for the end shaping of something like a hat worked in the round.  It works especially well with a pattern like the Mock Rib Watch Cap, which has the decreases worked in rapid succession right at the very end. 

Knit your piece until you are close to working the decrease.  Work to one stitch beyond the end of round marker, so you don't have to worry about the marker falling out.


Now, make a slip knot in your working yarn, right up next to the stitch you just worked.


Loop that little noose over your right hand needle so it doesn't work itself out, then work all the way around to one stitch past the marker again.  Put a second slip knot in your yarn.  Make sure not to work that slip knot from the beginning of the row as a stitch!  Here you can see that I took it off the needle after working the last stitch.


Place a removable stitch marker, safety pin or loop of yarn through your second slip knot to keep it from coming undone, and pull it tight.


OK - don't hate me now!  You're going to unknit (tink) that entire row, all the way back to the first slip knot.  The amount of yarn you have between the first and second slip knots is the amount you need to work one round.  Measure it with a measuring tape and make a note of the number.


Don't hate me again:  we have to do a little math here!  For this pattern all the decreasing happens in the last 7 rows.  There are 4 decrease rows which reduce the number of stitches by half, alternated with plain rows.  So you're going to work 7 rows, but you don't need 7 full rows worth of yarn.  It's not too hard to figure out how much you need.  I'll use the numbers from this pattern as an example.

Hat starts with 88 stitches.

1st decrease row reduces to 44 stitches; one row plain at 44 stitches = one full row (88 st. total)
2nd decrease row reduces to 22 stitches; one row plain at 22 stitches = one half row (44 st. total)
3rd decrease row reduces to 11 stitches; one row plain at 11 stitches = one quarter row (22 st. total)
4th decrease row reduces to 6 stitches; remaining yarn is threaded through to close = approx. one quarter row

Add them up:
1 + 1/2 + 1/4 + 1/4 = 2

So we only need to save enough yarn to work 2 full rows.  Measure off that amount from the end of the ball, being very careful not to stretch the yarn out as you do so.  Place another slip knot to mark, and then wind or twist that into a ball if you want to.


Then just keep working your hat til you get to that marker!  Once you're there - or close enough that you can't work a full row - begin your decreases to finish your hat.


I don't always do this, but it's a great trick for those times when I have a luscious yarn like this and I want to use up every last bit and make my hat a tiny bit slouchier.  I was able to get about 3 extra rows by doing this - just over a half inch of length!

This method can also be used for knitting flat, however, a general rule of thumb with stockinette knit flat is that the width of the work x 3 gives you the amount of yarn needed to work one row.  Notice I said stockinette though - a very textured stitch will produce different results, sometimes wider and sometimes narrower.  In those cases, this is a great method to have in your bag of tricks!

Thursday, September 19, 2013

Mock Rib Watch Cap

So yesterday while my hair was all snazzy, I took a couple pictures of my recently-finished Mock Rib Cap.  This hat was a joy to work on, and once it was done I liked it even more!  The thickness and wideness of the mock rib section is going to keep my ears nice and cozy this winter. 

Gah!  I love my hair!!

I have a teeny tiny head (exclusive of hair!) and I also knit pretty loosely, so I used a size 5mm needle, one size down from recommended.  It came out just right for me.   The style of this cap includes just a tiny bit of slouch - I think this is the perfect amount.


I wanted to use as much of my yarn as possible, so I added a few rows.  I'm going to write up a post for tomorrow to tell you the trick I used to figure out when to start shaping the crown.  I took a whole lot of pictures while I was knitting it, so it definitely needs to be broken down into two posts!

I know a few of you are brand-new knitters, and I've had a couple requests for tips on circular and DPN knitting.  So I'm planning on making a second version of this hat and doing a tiny tutorial series with a video or two.  I got the same yarn, but in a lovely orangey-rust that should go nicely with the coat I'm planning to make this fall.  Ooooooh!  Exciting!

Wednesday, September 18, 2013

Anna Almost-Wearable Muslin

But let's get real - I'm already wearing it, so there's not a huge chance I'm going to change my clothes!

I finished this up this morning, after working on it bit by bit over the last week.  The jury's still out on this, and if I do make it again, I'll have to make some more changes.


The only changes I've made so far are to go from a size 6 at the bust to a size 8 at the waist and hips, and a 1" swayback adjustment (a half inch either side of my horizontal line).

According to the pattern envelope, I should be in a size 2 for the bust, but I wanted room for my shoulders and I don't like to be constricted.  Also, I didn't want to grade across 3 sizes from bust to hip, and I think I do need the room of the 8 in the waist and hips.  The bodice feels a bit big though, so I may scale it back to a 4 next time.  I'll also need to take some length out of the bodice over all - maybe 1/2" - and a bit more in the swayback, 1/4" or so.  As it is, I'm getting some "lumping" around my waist where the bodice meets the skirt.  I tried to capture it for you, but the combination of my on-its-last-leg camera and this crazy fabric I used make it a little difficult to see:

let's pretend we don't see that weird wrinkle you-know-where


you can see that the front is still a bit shorter than the back


Things I did differently from the instructions:

1.  Interfaced my neck facing with my very lightest interfacing - I wanted a bit more structure there.

2.  Pressed the waist seam down rather than open.  Let's face it:  you just can't get away from Gravity.  It was going to end up that way eventually, so I just pre-empted it.  I finished the two seam allowances together with the serger.

3.  Tacked my facing to the shoulder by stitching in the shoulder seam ditch for 3 stitches - a nifty trick I learned from the Pattern Runway Kimono Dress instructions.

4.  Understitched my facing to the seam allowance, then trimmed it to about 1/4".  (This is, of course, after clipping into the curve.)


Things I didn't do and wish I had (aside from the fit issues):

1.  A full lining.  This fabric is one of the more supple quilting cottons, and it feels a bit lightweight to me.

In the Beginning Fabrics:  Bloom Modern, Seeds Red

2.  Stabilize my zipper opening.  Honestly, by the time I got to the zipper, I was getting kind of bored.  I really just finished the dress to get it off my coffee table.

3.  Taken more care with my hem.  The fabric is so busy no one will notice the terrible job I did, but I know it.

4.  Lengthened the skirt.  I only hemmed it to about half the height recommended in the instructions, and this "midi" length hits me mid-knee.  I'm only 5'4"  people!  I wanted it a little bit longer to coordinate with the vintage vibe of my cool shoes:


Conclusion:

It's OK.  I don't love it and I don't hate it.  I'm not sure yet if I like it enough to do the work it needs to fix it, and if I do, it will be a while.  Right now I'm ready to move on to something else.  I like it slightly better belted, but I don't have a belt to go with these shoes.


I'm sure you've also noticed that these pics are a little hair update.  I'm not at the point yet where my second-day hair looks as great as the first, but I've definitely got a lot more curl going on than I did a week ago!  I'm really loving this method so far.


this picture is about the hair

I want to give a big shout-out to Pam at Paint Box Polish for turning me on to Turbie Towels - thanks Pam!  I bought a couple a few days ago and tried it out this morning for the first time.  Between the Turbie Towel and the diffuser, my hair was dry enough to work with in about a half hour!  Go get one, people!


NATURAL!! I still can't believe it!

Sunday, September 15, 2013

Mocking Bird

The knitters among you know me as Yellowbird on Ravelry.  Well, right now I've decided I'm a mocking bird, because three out of the five projects I have on the needles use Mock Rib!  It's a stitch I like but don't use all that often; I thought it was pretty funny that they all coincided like this.  Here's what I'm working on, in order of oldest to newest.

My second sweater from that fabulous 1958 book I got from my mom, Bernat's "Bulky Knits by Mirsa of Italy."  This one uses the reverse side of mock rib to give a nice texture.  It's done in fingering weight - I have no idea how that made it into a book of bulky knits, and it's not the only fingering weight sweater in there either!


The pattern calls for a tweed yarn, but I'm using this Rowan 4 Ply Soft I've had in my stash for years.  It's heathery rather than tweedy, but I think the fabric is still quite nice.

this is the outside of the sweater

and here's how it looks on the inside

Project number two is my "to go" project.  I made a lot of headway on this last week while waiting in the doctor's office!  This is a nice, free pattern you can link to from Ravelry

it says mock cable, but it means mock rib

it does say mock rib in the instructions though!

the ribbed section of my hat

I'm using the yarn it calls for, Cascade's Eco Cloud - it's the one skein I have left over from last year's BFF cowl.  I thought it would be nice to have a hat to match my cowl!  And this yarn is sooooo soft and cozy.

Lastly, I started something new with a very special yarn.  I'll write about this one in more detail once I've got a little more to show.  I'm blatantly copying Linda and making a Relax sweater in her hand-dyed Islington yarn.  Different color though, so at least I get half a mark for originality!


It's a grey, rainy day here.  A perfect day for knitting, and that is just what I intend to do!


Friday, September 13, 2013

A new fiber project

My hair!!  This is along the lines of a PSA ;-) 

I don't think I've ever mentioned it before, but I often have trouble sleeping.  One night last weekend when I couldn't sleep, I ended up doing a massive google research to see if there were any tips I could find to deal with my hair.

My hair has been bugging me for the last few years.  It's always been naturally wavy, but even more so since perimenopause.  When it's wet, it hangs in long, loose, pretty curls.  But as soon as it dries, it ends up in a frizzy, poofy mess!

Well, after that hair-research marathon, I ended up ordering the book Curly Girl.  I read it this week and today was my first day of trying out the method.  I'll outline below what I did, but first let me say I am very pleased for a first trial.  Check out my hair:

My hair is dry!!

Another resource I found is the website NaturallyCurly.com - there's a little test there you can take to find out what kind of curl or wave you have, which will influence what kind of care you need.  I'm a 2B  -  Wavy Curvy.

One of the problems I've had with my hair aside from the frizziness is that the curls and waves are not uniform across my head.  Apparently this is pretty common for my type of hair.  One of the reasons I'm so pleased today is that the waves look consistent for the first time.

So here's what I learned:

* Use sulfate free shampoo and conditioner.  Really - I had no idea.  I knew that my "moisturizing" shampoo and conditioner were drying out my hair, but didn't know there was another way.  And it was expensive salon stuff too!  I ended up buying Nature's Gate Hemp Shampoo and Conditioner from the health food store for 1/3 the price of my salon brand, and it works SO much better!

* Do not use combs or brushes.  The only detangling I did was with my fingers while it was wet. 

* Do not dry the hair with a regular bath towel - they are too textured and end up producing frizz.  I dried my hair by gently scrunching out the moisture with an old tee shirt.

* After washing and conditioning, scrunch gel or mousse into the hair and then DON'T TOUCH IT until it's dry.  This was really hard for me.  I'm so used to pulling it back into a ponytail or bun after combing it out.  But I hung in there, and I'm really pleased with the result.  Again, no need for an expensive salon product:  I used Suave Professionals Captivating Curls Mousse (recommended on NaturallyCurly) which I picked up at Target for about $3.  Once the hair is dry, scrunch it again to release the stiffness from the gel or mousse.

* Avoid products with the following ingredients:  sulfates, silicone, any other chemical ending in "cone" like dimethicone, alcohol.

So - really off topic from what I usually post about it, but I was super excited about this so I couldn't resist sharing!  I'm very curious to see how it looks tomorrow after I sleep on it.  But I may not sleep - I may just sit up all night admiring my hair!

Do any of you ladies have wavy or curly hair frustration?   I'm hoping this is helpful to someone else out there, but there's a good chance that all this is common knowledge and I'm late to the party yet again!

Thursday, September 12, 2013

Finally: Victoria II

I finished my second Victoria Blazer a week and a half ago, and only today did I have the right combination of wellness, time and weather to take some pictures.  Honestly, it was a little warm for this by the time I got home from my errands, but it was almost cool enough for it first thing in the morning!  I took a page from Ginger's book and wore it with jeans and a graphic tee:


And because that photo doesn't really show you exactly what the blazer looks like, I give you this:


And this:


This one is made of Essex Linen in Ruby, and what I thought was cotton ikat from my stash for the lining.  The Essex Linen is a fabric used by quilters - I'm using it in my Featherbed Quilt.  It's 55% linen and 45% cotton, and a little heavier than quilting cotton.  It feels a bit scratchy against my skin, but it has a great combination of linen look and cotton ease of use.  It also comes in lots of colors and is pretty inexpensive, so I would definitely use it again.

The lining fabric is a piece I bought a couple years ago from Vogue Fabrics.  I intended it to be a blouse, but then never found a pattern I thought would be a good match.  But when I bought the Victoria pattern, I immediately thought it would make a great lining and contrast collar and cuffs.  (I did struggle for a while though, trying to decide whether it really should be a lining, or whether it should become another Archer shirt.)  The fabric was labelled as cotton on the bolt, but we all know that Vogue's forte is not labelling.  This time it worked to my advantage:  I'm pretty sure (after working with it and doing a burn test) that this is actually silk/cotton - and it cost me $5 a yard!  Several months ago, I saw this same fabric at another local fabric shop for twice that price, so I'm patting myself on the back for having picked it up when I did.  It has a very soft hand and a subtle sheen that of course my camera can't pick up.


I knew that I didn't want this jacket to be cropped, but I also didn't want it to be the full length.  So I ended up taking 3" off the bottom, which happens to be exactly where the bottom notch for the pockets is.  I didn't want my jacket to have pockets because I find in-seam pockets to be a nuisance, so it worked perfectly for me.  It hits me mid-hip, which is just what I wanted for this version.  So if you're 5'4" and want this length too, 3" is your magic number!


I left the sleeves unlined on this one, partly because I didn't want to be too hot and partly because I was hoping to save enough of my lining fabric to squeeze out a tank top.  I was already on my way to having a bad cold when I was finishing this up, so it may have been sinus-brain, but the directions for finishing the lining at the armhole didn't make a lot of sense to me.  I ended up stitching around the armhole of my lining at 1/2", then clipping and folding it under before catch-stitching it to the seam allowance of the already set-in sleeve.

Because the sleeves are unlined, I needed to finish the seam.  And because I was already starting not to feel great, I didn't want to get my serger out to finish them as I normally would.   So instead I turned the seam allowances under and stitched.  I did it this way because it was the path of least resistance, but I really love how it looks! I'll have to stop avoiding this in the future!


Now here's a confession:  on both of my Victorias,  I was unable to get the cuffs to meet exactly flush on the outside.  You can see the little gap here:


So on both cuffs of both jackets, I did some tiny, invisible stitching to close that gap.  I enjoy hand stitching, and little gaps like that really drive me crazy.  I can't see how it's avoidable either, the way the cuffs are attached.  Are you guys getting yours to meet up perfectly?  I often go back to clean things up with some invisible stitches, so I just wanted to throw it out there.  A year ago I would have thought I was cheating and that I should have done it "right" in the first place, but now I feel like, hey - whatever gets the job done!  Also, when I'm hand-stitching, I like to pretend that I'm a couture seamstress . . .

This jacket was on my mind for about half the summer, so I'm glad I finally got it done.  And I think the weather will start to be jacket-appropriate any day now - I still haven't been able to wear my first one!  I have high hopes for the weekend though, when we'll be getting together with some visiting friends.

I really like this one, but I did feel a little conspicuous at the grocery store this morning.  This shade of red is not for the faint of heart!  But later I had a meeting to go to, and the lady I met with said, "I love your style!"  So that was very encouraging - honestly I do question my fashion choices sometimes.  Doesn't stop me from wearing some crazy stuff, but at least I'm aware it's crazy stuff!