

Friday, November 30, 2012
Yesterday's Nails
I really like this stamping I did yesterday. I think this plate has a lot of potential - it's like the "saran wrap" technique, but without the mess!

Thursday, November 29, 2012
Kiddie Style
Here's the Renfrew I made over the weekend - my first long-sleeved version.

This print is probably a little too juvenile for me - it reminds me of little girls' pajamas. But I don't care. I wanted some cheerful tee shirts to brighten the winter days that are coming. And this is pretty darned cheerful!

It's warm too, because the fabric (from Girl Charlee, natch) is a cotton-lycra blend, so it's on the heavier side. But I have to admit, it's not my favorite kind of jersey to sew. It tends to resist the needles, pins and rotary cutter. But it turned out well. I even did a cute little zigzag neck edging for the first time:

I'm going to put this on today and head out to the fabric store!
Wednesday, November 28, 2012
HB Pencil* Skirt, or Burda 7175
*HB = Hips and Buns. In other words: this skirt is too tight!
I finished it last week, but didn't have the time or inclination to take pictures until yesterday. Also, I have a lot of things I want to say about this project, so I've spent some time getting my thoughts in order, as opposed to my usual stream of consciousness. I made an outline and everything!
Let's start with the pattern envelope, so you can see the lines and style of the garment.

This Burda pattern (7175) is listed only as "retro" - no year is given. But the style looks to me like early 1960s. I love the whole ensemble, and while I traced the pattern pieces for both the top and the skirt, I decided to start out by making the skirt only. This is the first time I've used one of the Burda patterns that comes in an envelope, so this project was as much about testing the pattern company as it was about testing the garment. I did a couple of searches, and haven't found any other examples of this garment or reviews for this pattern, so I wanted to include my two cents here.
The Burda patterns that come in the envelope have the seam allowances already included, unlike the ones from the magazine, so that's a plus. One thing I liked about the tissue is that the finished hip measurement was clearly shown on the skirt piece. Something I didn't like so much is that the sizing information is also printed on the tissue, rather than on the envelope. I found it tedious to have to unfold the tissue to figure out what size to make, and then refer back to the envelope back for the fabric requirements.
I did my usual alteration of grading out to a larger size for my hips: size 38 at the waist to 40 at the hips. According to those finished measurements on the tissue, this should have been sufficient, giving me about an inch and a half of ease. The true story though, is that from my initial basted fitting, I could tell it was too tight, so I did 4/8" seams rather than 5/8" - and it still wasn't enough. So I would say that unlike the Big 4 pattern companies, the Burda patterns do not include excessive ease. If I'd been really smart, I would have actually measured the pattern pieces, rather than taking their word for it!
The rating on the front of the envelope calls the pattern "easy" and I'd say that's accurate - IF you've ever sewn a skirt before. The instructions are sketchy in some places, and the vent is rather strange. I haven't made a whole lot of skirts with vents, but the way this one deals with the vent seems like a cheat to me: you attach a square of fabric to the inside on the lining, so that it looks as if you'd done a small inverted pleat there.

I had a few reasons for making the skirt as given. I trusted (perhaps wrongly) that this really was a reproduction of a pattern from the '60s, and I wanted to make something that fit as a lady would have worn it back then. Also, since it's probably impossible to find a RTW pencil skirt that would fit my curvy frame, I don't have a whole lot of experience with how one is supposed to fit! As I said, when I tried it on as I was making it, I already knew it was too tight, but decided to finish it anyway. Interestingly, once I had the lining in, it seemed to fit much better! The lining made the lines of the skirt much smoother than they had been.

Another factor in the poor fit of the skirt is probably my fabric choice. This is a wool blend gabardine, chosen for its beautiful eau de nil color (and also its cheap price). Of course, in the face of this gorgeous shade, I completely forgot that there's absolutely no give in gabardine. In a fabric with some stretch, I could probably get away with using these pattern pieces.
I think the pattern cheats at the waistband too: it's just a long rectangle. I think this could have benefited from a more shaped waistband.

This project was all about experimentation for me, and I'm still working on it, as I think it's got potential. One of the things I tried out that I love was my new blind hem foot. Check out the photo on the right above: you can barely see where the hemming stitches poke through to the front of the fabric! I've gotten fairly good at blind hems over the years, but this foot makes it incredibly easy to do it perfectly. Well worth the few dollars I spent on it.
I do plan to let out the side seams a little, but I went ahead and took some pictures yesterday anyway because I had a little free time. I also think it's good to see the drag lines in the photos - they really do show where the garment needs to be adjusted. If I can't let this skirt out enough to make it more presentable, I may make it again in the same fabric, because it goes with a lot of my other me-mades!

With one of my Sencha blouses. As you can see, all the drag lines are at the hips. Although on a skirt, I guess there's not really anywhere else they would be!

With the 1940s reproduction silk blouse.

With a sweater I've had for years, but have nothing to wear with. That nifty faux fur collar is part of the sweater.
And now for an admission: I love that last outfit, and that sweater is the main reason why I want to make the skirt work. When I first put on the two together, I thought, "The only thing I need to make this the perfect outfit is some leopard-print pumps." I've been looking for the perfect pair for about 3 years, but never found anything that matched what I had in mind. Until last week, when I was picking up a few things at Target, and I spied these beauties:

Exactly what I'd been looking for, and only thirty bucks! (The uppers are even leather!) So, for the first time in almost a year, I've broken my Seamless Pledge. But I don't even care - they're perfect!
I finished it last week, but didn't have the time or inclination to take pictures until yesterday. Also, I have a lot of things I want to say about this project, so I've spent some time getting my thoughts in order, as opposed to my usual stream of consciousness. I made an outline and everything!
Let's start with the pattern envelope, so you can see the lines and style of the garment.

This Burda pattern (7175) is listed only as "retro" - no year is given. But the style looks to me like early 1960s. I love the whole ensemble, and while I traced the pattern pieces for both the top and the skirt, I decided to start out by making the skirt only. This is the first time I've used one of the Burda patterns that comes in an envelope, so this project was as much about testing the pattern company as it was about testing the garment. I did a couple of searches, and haven't found any other examples of this garment or reviews for this pattern, so I wanted to include my two cents here.
The Burda patterns that come in the envelope have the seam allowances already included, unlike the ones from the magazine, so that's a plus. One thing I liked about the tissue is that the finished hip measurement was clearly shown on the skirt piece. Something I didn't like so much is that the sizing information is also printed on the tissue, rather than on the envelope. I found it tedious to have to unfold the tissue to figure out what size to make, and then refer back to the envelope back for the fabric requirements.
I did my usual alteration of grading out to a larger size for my hips: size 38 at the waist to 40 at the hips. According to those finished measurements on the tissue, this should have been sufficient, giving me about an inch and a half of ease. The true story though, is that from my initial basted fitting, I could tell it was too tight, so I did 4/8" seams rather than 5/8" - and it still wasn't enough. So I would say that unlike the Big 4 pattern companies, the Burda patterns do not include excessive ease. If I'd been really smart, I would have actually measured the pattern pieces, rather than taking their word for it!
The rating on the front of the envelope calls the pattern "easy" and I'd say that's accurate - IF you've ever sewn a skirt before. The instructions are sketchy in some places, and the vent is rather strange. I haven't made a whole lot of skirts with vents, but the way this one deals with the vent seems like a cheat to me: you attach a square of fabric to the inside on the lining, so that it looks as if you'd done a small inverted pleat there.

I had a few reasons for making the skirt as given. I trusted (perhaps wrongly) that this really was a reproduction of a pattern from the '60s, and I wanted to make something that fit as a lady would have worn it back then. Also, since it's probably impossible to find a RTW pencil skirt that would fit my curvy frame, I don't have a whole lot of experience with how one is supposed to fit! As I said, when I tried it on as I was making it, I already knew it was too tight, but decided to finish it anyway. Interestingly, once I had the lining in, it seemed to fit much better! The lining made the lines of the skirt much smoother than they had been.

Another factor in the poor fit of the skirt is probably my fabric choice. This is a wool blend gabardine, chosen for its beautiful eau de nil color (and also its cheap price). Of course, in the face of this gorgeous shade, I completely forgot that there's absolutely no give in gabardine. In a fabric with some stretch, I could probably get away with using these pattern pieces.
I think the pattern cheats at the waistband too: it's just a long rectangle. I think this could have benefited from a more shaped waistband.

This project was all about experimentation for me, and I'm still working on it, as I think it's got potential. One of the things I tried out that I love was my new blind hem foot. Check out the photo on the right above: you can barely see where the hemming stitches poke through to the front of the fabric! I've gotten fairly good at blind hems over the years, but this foot makes it incredibly easy to do it perfectly. Well worth the few dollars I spent on it.
I do plan to let out the side seams a little, but I went ahead and took some pictures yesterday anyway because I had a little free time. I also think it's good to see the drag lines in the photos - they really do show where the garment needs to be adjusted. If I can't let this skirt out enough to make it more presentable, I may make it again in the same fabric, because it goes with a lot of my other me-mades!

With one of my Sencha blouses. As you can see, all the drag lines are at the hips. Although on a skirt, I guess there's not really anywhere else they would be!

With the 1940s reproduction silk blouse.

With a sweater I've had for years, but have nothing to wear with. That nifty faux fur collar is part of the sweater.
And now for an admission: I love that last outfit, and that sweater is the main reason why I want to make the skirt work. When I first put on the two together, I thought, "The only thing I need to make this the perfect outfit is some leopard-print pumps." I've been looking for the perfect pair for about 3 years, but never found anything that matched what I had in mind. Until last week, when I was picking up a few things at Target, and I spied these beauties:

Tuesday, November 27, 2012
BFF Cowl Complete!
Evelyn and I are going live with our completed BFF Cowls today! Here's mine:

I actually finished it almost 2 months ago, in early October, and I put it on as soon as I did. Hubby said, "That's really cool, the way those two pieces link together!" He's a man of taste and discretion, I tell you!
I'm very happy with the way this turned out, and I've still got one more skein of the Lupin Cascade Cloud. I'm planning on turning it into some matching mitts or a hat. Despite a couple bumps in the road (my own fault, for not reading the directions through) this was a joy to knit. Definitely recommended!
Here it is in my powder room mirror, as I was on my way out the door the day I finished it. The light isn't great in there; the color is much more accurate in the above photo.

On that day I had to take it off after about a half hour - we were having unseasonably warm weather. But now winter has begun, so I can start actually wearing it!
Sunday, November 25, 2012
Purple Polkas
Do polka dots have anything to do with the polka dance? Which came first?
Anyhooo . . . I did this stamping a while ago to cover up the tip wear I was getting on my mani. I thought this one was pretty cute!


But the next time I use this stamp, I'd like to try it with two very different colors - like black and white - to give it a more Op Art feel.
Anyhooo . . . I did this stamping a while ago to cover up the tip wear I was getting on my mani. I thought this one was pretty cute!


But the next time I use this stamp, I'd like to try it with two very different colors - like black and white - to give it a more Op Art feel.
Tuesday, November 20, 2012
Two months and two days
It's done. I can stop complaining now! (Well, about this anyway!)

It felt like I was working on this sweater and this sweater alone all fall. Especially in the last couple of weeks, I really made a push to get it done and didn't work on any other knitting. So I was surprised when I looked back at my projects page on Ravelry and discovered that it "only" took two months and two days. Not only that, but during that time I also made:
three pairs of mitts
a double cowl
a hat
a turban
AND
finished my lace stole and socks that had been started before I began this sweater.
Isn't perception a funny thing?
I think part of the reason it felt like it took so long was that I really didn't enjoy working with this yarn. It feels dry and crinkly, and doesn't have a whole lot of bounce. However, I do like the fabric it produces.
The recommended ease for this pattern is 4 - 6", so I went with the first size, which gives me 4.5" inches of positive ease. This is something I really like about the Brooklyn Tweed patterns I've used: not only is the recommended ease given, but the pattern also specifies the size and amount of ease shown on the model, so you get some sort of frame of reference. The fit is interesting, because although there's a lot of ease in the body, the sleeves are more fitted than you'd expect.

There are a couple of details on this sweater that I like a lot. The one-row buttonholes look very neat, and the construction of the pockets is one I like but don't usually use.

And there are a couple of things I'm not so crazy about. The shawl collar, while very dramatic, is really too wide to be practical. This makes it bunch up at the back, and even so, it feels like it goes half way up the back of my head!

Also, while the pattern is very well written, I felt that it didn't explain well at all how to deal with the front neck decreases as they encroach on the cables - you're really kind of left to your own devices there. I'm not 100% happy with how I did it, but I got stumped for a better solution!
It's one of those things that no one but me will notice, but I wanted to mention it as part of my "review" of the pattern.
One thing that helped me a lot was an app I downloaded onto the iPad called JKnitHDLite. I've mentioned before that when I'm following a chart, I usually have a sticky note that I line up at the top edge of the row I'm working on, and move it every row. Well, this app allows you to import PDF patterns and has a device that will highlight a row on your chart. You can change the width of your highlighter, and a double tap above or below it will move it up or down one row! It really made working from a chart much faster and easier to read. The app I linked above is free, but I liked it so much I downloaded the "Pro" version, although I haven't had a chance to try it out yet.
Even though it wasn't a "fun" knit for me (I know I whined about it a lot!) I'm glad I made this sweater. It's very cozy and blanket-like. Are any of you tempted to try it out?

It felt like I was working on this sweater and this sweater alone all fall. Especially in the last couple of weeks, I really made a push to get it done and didn't work on any other knitting. So I was surprised when I looked back at my projects page on Ravelry and discovered that it "only" took two months and two days. Not only that, but during that time I also made:
three pairs of mitts
a double cowl
a hat
a turban
AND
finished my lace stole and socks that had been started before I began this sweater.
Isn't perception a funny thing?
I think part of the reason it felt like it took so long was that I really didn't enjoy working with this yarn. It feels dry and crinkly, and doesn't have a whole lot of bounce. However, I do like the fabric it produces.
The recommended ease for this pattern is 4 - 6", so I went with the first size, which gives me 4.5" inches of positive ease. This is something I really like about the Brooklyn Tweed patterns I've used: not only is the recommended ease given, but the pattern also specifies the size and amount of ease shown on the model, so you get some sort of frame of reference. The fit is interesting, because although there's a lot of ease in the body, the sleeves are more fitted than you'd expect.

 |
| I got some nice leather buttons. |

And there are a couple of things I'm not so crazy about. The shawl collar, while very dramatic, is really too wide to be practical. This makes it bunch up at the back, and even so, it feels like it goes half way up the back of my head!

Also, while the pattern is very well written, I felt that it didn't explain well at all how to deal with the front neck decreases as they encroach on the cables - you're really kind of left to your own devices there. I'm not 100% happy with how I did it, but I got stumped for a better solution!
 |
| You can see where the rightmost cable just sort of ends in mid-air. |
One thing that helped me a lot was an app I downloaded onto the iPad called JKnitHDLite. I've mentioned before that when I'm following a chart, I usually have a sticky note that I line up at the top edge of the row I'm working on, and move it every row. Well, this app allows you to import PDF patterns and has a device that will highlight a row on your chart. You can change the width of your highlighter, and a double tap above or below it will move it up or down one row! It really made working from a chart much faster and easier to read. The app I linked above is free, but I liked it so much I downloaded the "Pro" version, although I haven't had a chance to try it out yet.
Even though it wasn't a "fun" knit for me (I know I whined about it a lot!) I'm glad I made this sweater. It's very cozy and blanket-like. Are any of you tempted to try it out?
Sunday, November 18, 2012
Cambie Muslin Mega-Post
Here's the dress on a hanger, front and back.

I really like this dress, and when I put it on this morning to take pictures, Hubby said, "Wow, I think that's the best thing you've ever made!" One of the things I like is that the olive green background of the fabric is pretty much the same color as my eyes (color is accurate above). One thing I don't like so much is that for some reason which I haven't been able to figure out yet, the waistband doesn't meet up in the back, although everything else does:

On the other hand, thanks to my new invisible zipper foot, I've done my best zipper insertion ever. Look at the difference when compared to the Parfait dress I made a year and a half ago - at the time I was pretty darned proud of myself for that zipper!

The purpose of making this dress was to experiment with fit. I made my first one in a straight size 6, as Sewaholic's size 6 measurements are the same as mine. I was happy with the dress, but felt that the fit was somewhat looser than what I've been seeing around on other ladies. My ultimate goal is to make the dress in a very special fabric gifted to me by Andrea; before I cut into that piece, I want to make sure I have the fit I want with this pattern. I also wanted to try out the full-skirted version just to see how I liked it, as A-line is my default skirt shape.
The verdict? Well, I'm not really sure. The size 6 fits. The size 4 also fits, but in a different way.


It also occurred to me that getting the right fit depends on first deciding what that means to you: I've decided that fit is a very subjective thing. I'm happy with both my dresses; they both fit, and I think they both look good on me. I haven't yet decided which silhouette I like better though: the relaxed easiness of the first one, or this more retro fit. I'm also not in the least surprised that Hubby prefers the closer fit!

I didn't actually do any adjustments on this muslin - I made a straight size 4. I did however bring the shoulder pieces down further than recommended into the openings at the neckline, and more on the right side, which brings that shoulder seam forward. What I ought to have done is sew the right shoulder seam about a quarter of an inch deeper. Maybe next time.
Interestingly, I have a couple of gapes on this dress which I also have on the larger size: one at the peaks of the sweetheart neckline, and the other at the back of the armhole. I haven't yet figured out how to deal with these (or even if I need to), although for the neckline I'm thinking a little interfacing would help.


And of course, no post would be complete without me confessing my errors. I had decided that I wanted to skip the pockets on this one, because I've always found pockets on full skirts to be kind of tedious - you have to shift so much fabric around to find the opening. What I didn't realize until I'd cut out all my fabric and begun sewing is that the pockets on this version are not at the side seams: those seams have been brought in toward the center to make the pockets more easily accessible. Thankfully, my print was busy enough that it doesn't really show.
I also found this version a little trickier to sew, just because of the mass of fabric in the skirt. I felt like I spent way more time shifting it all around, and of course there's more to deal with in the gathering and hemming. Still, I like the end result - it's very feminine, and goes well with my red pumps!
Thursday, November 15, 2012
Detour
Remember way back in the summer when I made this Portfolio Top?

I was so in love with the fabric, that when I found three more remnants of it at Vogue shortly thereafter, I bought them all! And I've decided that it will be great for Muslin #2 of the Cambie Dress. This time I'm going to make the next smaller size, and the full-skirted version. Here's what I kind of think it will look like:

And no, I haven't finished my pencil skirt. Or my Exeter sweater.
Tuesday, November 13, 2012
Unsolicited Advice
I'll be honest: finishing a sweater isn't the most fun part of the process. But it's not the worst either! I tend to use my finishing as a respite from knitting: those times when I've been knitting so much that my hands and fingers hurt and I just can't knit another stitch, but I still want to work on my sweater - those are the times I do most of my finishing.

I've finished knitting the back and both fronts (in their entirety) of the Exeter cardigan. I have started on the sleeves, but I've also been working on the finishing: sewing closed the pockets, weaving in the ends, closing the collar with Kitchener stitch and seaming the shoulders and sides. That way I feel like I still have forward movement on the project, and once I finish the sleeves I'll truly be almost done!

I've finished knitting the back and both fronts (in their entirety) of the Exeter cardigan. I have started on the sleeves, but I've also been working on the finishing: sewing closed the pockets, weaving in the ends, closing the collar with Kitchener stitch and seaming the shoulders and sides. That way I feel like I still have forward movement on the project, and once I finish the sleeves I'll truly be almost done!
Monday, November 12, 2012
Put down your pencils.
Work on the pencil skirt is ongoing. After assembling most of the shell on Thursday, I decided that I wanted to pick out the back seam and do it again. The problem though with finding a very close match between thread and fabric is that it can be difficult to see your stitches to pick them out! By the time I'd gotten to that point, it was late afternoon and there wasn't enough light to see what I was doing, so I set it aside.
On Friday, I decided that what I really needed right away was some dark brown narrow-leg pants. It's an item I'd been feeling I was missing for quite a while: there have been so many times in the last months that I've wanted to wear a top, but felt I needed these pants to make the perfect outfit. While I was at Vogue last week getting the fabric and notions for the pencil skirt I happened to find some stretch cotton twill in the exact shade of brown I'd been wanting, so I snapped up two yards. On Friday, I washed it up and made it into my third pair of Clovers.
These aren't any different than the first two pairs I made. I made the longer length, without the pockets, using the pattern adjustments I'd made in my muslin. The only difference this time was that I used the invisible zipper foot on my new sewing machine. And WOW! That thing makes a big difference:

And it makes it so easy. I did discover though that I don't like the normal zipper foot on the Janome at all. It's quite a bit wider than the one on my Kenmore, which made sewing the seam below the zipper difficult.
Yesterday I finally got around to "fixing" a top I'd bought on sale at Anthropologie maybe three years ago. I bought it because the fabric is a design by Vera Neumann (whose scarves I collect and love). I don't think the shape is fantastic for me (it does come with a waist tie, but I opted not to wear it today) but the fabric is so pretty, and it goes with my new pants! However, like a lot of my tops from Anthropologie, the shoulders were way too high, so the neckline hung too low. Because we had a lot of sun yesterday morning, I got out my seam ripper and unpicked the binding around the neck, then took each shoulder in by an inch (half inch front and back) and restitched the binding on. It's still not a perfect fit, but it's a lot better than it was, and I think I'm more likely to wear it now.
I'm not bothering to show any details of the Clovers because you've all seen a million pairs of these pants by now! For me, and with my alterations, these are both comfy and flattering. The only thing I don't like, and haven't yet figured out how to fix, is the amount of bulk where the right waistband seam meets the side seam. No matter how much fabric I trim away, it's always bulgy there. Any ideas?
I wore this outfit to go have coffee with Alicia this morning, but since it was chilly, I also had to put on a sweater:

And my new Meandering Vines scarf. As I was taking pictures, the sunlight was coming and going. The complete outfit shot was super sunny:
There has also been a good bit of progress on the Exeter sweater. I'm hoping to do an update some time this week. I've also got a house that could really use a good cleaning. So I think work on The Pencil is at a temporary standstill. Good thing I don't really need a pencil skirt.
On Friday, I decided that what I really needed right away was some dark brown narrow-leg pants. It's an item I'd been feeling I was missing for quite a while: there have been so many times in the last months that I've wanted to wear a top, but felt I needed these pants to make the perfect outfit. While I was at Vogue last week getting the fabric and notions for the pencil skirt I happened to find some stretch cotton twill in the exact shade of brown I'd been wanting, so I snapped up two yards. On Friday, I washed it up and made it into my third pair of Clovers.
These aren't any different than the first two pairs I made. I made the longer length, without the pockets, using the pattern adjustments I'd made in my muslin. The only difference this time was that I used the invisible zipper foot on my new sewing machine. And WOW! That thing makes a big difference:

And it makes it so easy. I did discover though that I don't like the normal zipper foot on the Janome at all. It's quite a bit wider than the one on my Kenmore, which made sewing the seam below the zipper difficult.
Yesterday I finally got around to "fixing" a top I'd bought on sale at Anthropologie maybe three years ago. I bought it because the fabric is a design by Vera Neumann (whose scarves I collect and love). I don't think the shape is fantastic for me (it does come with a waist tie, but I opted not to wear it today) but the fabric is so pretty, and it goes with my new pants! However, like a lot of my tops from Anthropologie, the shoulders were way too high, so the neckline hung too low. Because we had a lot of sun yesterday morning, I got out my seam ripper and unpicked the binding around the neck, then took each shoulder in by an inch (half inch front and back) and restitched the binding on. It's still not a perfect fit, but it's a lot better than it was, and I think I'm more likely to wear it now.
 |
| I know - it makes me look preggers. |
I'm not bothering to show any details of the Clovers because you've all seen a million pairs of these pants by now! For me, and with my alterations, these are both comfy and flattering. The only thing I don't like, and haven't yet figured out how to fix, is the amount of bulk where the right waistband seam meets the side seam. No matter how much fabric I trim away, it's always bulgy there. Any ideas?
I wore this outfit to go have coffee with Alicia this morning, but since it was chilly, I also had to put on a sweater:

And my new Meandering Vines scarf. As I was taking pictures, the sunlight was coming and going. The complete outfit shot was super sunny:
 |
| Oooh, the mother ship is here! |
There has also been a good bit of progress on the Exeter sweater. I'm hoping to do an update some time this week. I've also got a house that could really use a good cleaning. So I think work on The Pencil is at a temporary standstill. Good thing I don't really need a pencil skirt.
Saturday, November 10, 2012
Rayures
I totally stole this from nailXchange. You can see her awesome mani here.
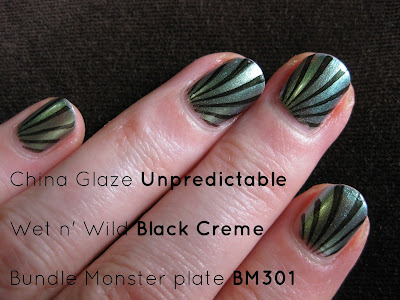
Unpredictable is one of the polishes from China Glaze's fall Bohemian collection. I wish I had the photographic skills to capture the color shifts on this polish - it's truly exquisite, changing from deep turquoise to emerald to golden green. Adding in the black stripes only makes it better, in my opinion!

Unpredictable is one of the polishes from China Glaze's fall Bohemian collection. I wish I had the photographic skills to capture the color shifts on this polish - it's truly exquisite, changing from deep turquoise to emerald to golden green. Adding in the black stripes only makes it better, in my opinion!
Thursday, November 8, 2012
Trepidation
Hubby: "What are you planning to do today?"
Me: "I'm hoping to make a pencil skirt."
Him: "What's a pencil skirt?"
Me: (tracing two parallel lines in the air with my hands)
Him: "Your body's not shaped like that. Your body's shaped like this." (tracing curves in the air)
Me: "I know."

Wish me luck, folks.
Me: "I'm hoping to make a pencil skirt."
Him: "What's a pencil skirt?"
Me: (tracing two parallel lines in the air with my hands)
Him: "Your body's not shaped like that. Your body's shaped like this." (tracing curves in the air)
Me: "I know."

Wish me luck, folks.
Wednesday, November 7, 2012
Houndstooth for Fall
Gah, I think this is one of my favorite manis I've done in a long time! I can't stop looking at it!

Incredibly, this is the first time I've used this plate! Now I'm daydreaming of other color combos . . .

Incredibly, this is the first time I've used this plate! Now I'm daydreaming of other color combos . . .
Tuesday, November 6, 2012


Monday, November 5, 2012
QOMB Finished
It feels like I've been doing nothing but work on my Exeter sweater for the last week, but in reality, I've had a houseguest, been on two dates with Hubby, and spent several hours finishing up my quilt. As the weather cools, I'm definitely going into hibernation mode: really all I want to do is knit! And now I've got two quilts to cuddle up under while I do so.

Honestly, once I was completely finished with this quilt last night, I felt a little underwhelmed. You know that feeling - when it looked so much better in your head than it does in reality. That's not to say I don't like it; I do. Just not as much as I was expecting to. But I learned a couple of good lessons along the way.
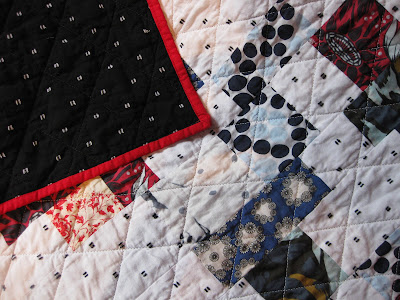
I made a few design decisions that I think made this one harder than the previous one. Because I didn't want to interfere with the pattern of the dotted Swiss on the back, I decided to do the quilting in between the rows of dots from the back, to create a diamond pattern. I knew I was taking a risk doing my quilting from the back, and the diagonals made it even more difficult because they created longer lines to quilt, and it meant that the quilting was done on the bias. I've got a couple of areas that demonstrate very well the need to keep all your fabric taut as you quilt:

Obviously, I didn't pick out those rows. I'm actually really OK with the imperfections on these first two quilts: I like knowing that I've got room for growth. And these wrinkles don't really show all that much now that the quilt has been washed.
When I was almost done with the quilting, my walking foot started to act up. The bar that goes over the needle clamp was getting stuck in the up position, so the feet weren't moving the fabric forward. This created very uneven thread tension; lines of quilting that previously looked like this:

Started to look like this, the white thread I used on the front pulling to the back:

I took my foot off, rethreaded my needle and reset my bobbin a couple times, but these fixes only lasted a few inches, so I went ahead and finished the last few rows of quilting, convinced I'd broken the foot and would have to buy a new one. After I finished, I got the bright idea to google "troubleshooting walking foot problems" and discovered that a drop of oil might fix it. I inspected my foot to see where the moving parts were, then added said drop of oil. And hey, presto! It worked! I was able to add on the binding with no further problems!

The oil goes on this little piston which is attached to the long bar that goes over the needle clamp. It sits in a little kidney-bean shaped opening:
The other thing I learned is that I've got a long way to go in terms of applying binding. There are a lot of places where my stitching shows at the edges, partly a function of choosing a highly contrasting color for the binding. But I didn't have the heart to take any close-up pictures of those boo-boos. Also, it's a very cloudy day here.
I'm pretty happy with how the quilting looks and how all the fabrics work together. I wish I'd done a little more planned placement of fabrics rather than making everything completely random. But overall I think it's a pretty good use of scraps. As I was making it, it seemed so much bigger than the first one, but in the end it's exactly the same width, and only about 3 inches longer.

The color and style go pretty well with my living room, so I think it will live down there.

It didn't use nearly as much fabric as I'd thought it would, so I still have pieces of most of these fabrics left! It might be time to make some little zippered pouches, or some more box bags . . .

Honestly, once I was completely finished with this quilt last night, I felt a little underwhelmed. You know that feeling - when it looked so much better in your head than it does in reality. That's not to say I don't like it; I do. Just not as much as I was expecting to. But I learned a couple of good lessons along the way.
I made a few design decisions that I think made this one harder than the previous one. Because I didn't want to interfere with the pattern of the dotted Swiss on the back, I decided to do the quilting in between the rows of dots from the back, to create a diamond pattern. I knew I was taking a risk doing my quilting from the back, and the diagonals made it even more difficult because they created longer lines to quilt, and it meant that the quilting was done on the bias. I've got a couple of areas that demonstrate very well the need to keep all your fabric taut as you quilt:

Obviously, I didn't pick out those rows. I'm actually really OK with the imperfections on these first two quilts: I like knowing that I've got room for growth. And these wrinkles don't really show all that much now that the quilt has been washed.
When I was almost done with the quilting, my walking foot started to act up. The bar that goes over the needle clamp was getting stuck in the up position, so the feet weren't moving the fabric forward. This created very uneven thread tension; lines of quilting that previously looked like this:

Started to look like this, the white thread I used on the front pulling to the back:


 |
| (from a slightly different angle) |
The other thing I learned is that I've got a long way to go in terms of applying binding. There are a lot of places where my stitching shows at the edges, partly a function of choosing a highly contrasting color for the binding. But I didn't have the heart to take any close-up pictures of those boo-boos. Also, it's a very cloudy day here.

I'm pretty happy with how the quilting looks and how all the fabrics work together. I wish I'd done a little more planned placement of fabrics rather than making everything completely random. But overall I think it's a pretty good use of scraps. As I was making it, it seemed so much bigger than the first one, but in the end it's exactly the same width, and only about 3 inches longer.

The color and style go pretty well with my living room, so I think it will live down there.

It didn't use nearly as much fabric as I'd thought it would, so I still have pieces of most of these fabrics left! It might be time to make some little zippered pouches, or some more box bags . . .
Subscribe to:
Posts (Atom)