Friday, September 30, 2011

ssssssssssssssssssss

Take a look at my fabulous snakeskin nails!!


I followed this awesome tutorial to do it.  Thank you so much, Kari, for sharing it with the interwebz!

I love, love, love snakeskin, although I don't own anything made of it.  Somehow I feel sorry for the snakes and always shy away.  So this is a great compromise!  Mine don't look as fantastic as Kari's, but I'm pretty happy with it.

I followed her tutorial almost exactly.  I substituted Zoya Jana for China Glaze Below Deck, and Essie Playa del Platinum for OPI Skull and Glossbones.  I also added on one coat of China Glaze Moonlight, a very sheer off-white, over the top of my blobs of color, to smooth things out and make it look a little more translucent. Here's how it looked before stamping:


For stamping I used Zoya Pinta, a very dark purple, since I don't have China Glaze VIII.  The print showed up a little more purple than I was hoping it would, but I still like it.  The plate is Bundle Monster 215.  Here are all my materials:

one coat Qtica Natural Nail Growth Stimulator
one coat Essie Chinchilly
blobs of Zoya Jana
blobs of Essie Playa del Platinum
a few blobs of Essie Chinchilly
one coat of China Glaze Moonlight
stamping with Zoya Pinta
two coats of Essie Good to Go

the plate and the paper I scraped the extra
polish onto, with my clean-up brush


And here are my nails again, with one of my "good" balls of Eau de Nil, not the evil ball:


The evil ball has been banished to the guest room, well away from the others, and the ribbing on the front is complete.  At least I have super-cool nails to look at while I reknit the thing.

Wednesday, September 28, 2011

Frustrated.

I've been doing a fair amount of knitting lately, although it may seem that I haven't. The two projects I'm working on have been going slowly, and despite all the work, they keep looking pretty much how they did a couple weeks ago when I showed them.

Yesterday I spent a couple hours watching a silly movie and knitting, and finally finished the first side of Betty and got it up to the neck shaping of the second side, when I discovered this:


Can you see the color difference?  ARGH!!  So frustrating!  Especially since all five balls I bought of this color were the same dyelot!

I was pretty upset about it yesterday, and had to set the thing aside, but this morning I turned it inside out to inspect it, and I've found that the middle ball - the one between the ribbing and the beginning of the armhole - is the culprit.  So I'm going to rip the whole thing out and start over.

I could just rip it back to the ribbing, but I've decided that I'm not really crazy about doing this in the round, strange as that may sound to some knitters.  I'm not happy with the way the shaping in the rib lies.  To be honest, a big part of the reason why I did it in the round in the first place is that I hate sewing up ribbing.  Other seams don't bother me, but I find ribbing to be kind of a pain.  But this just doesn't look good.

Luckily, I only really need four of the five balls I bought to complete this sweater.  I always buy an extra "insurance" ball, and it looks like this time my policy paid off.

Monday, September 26, 2011

Gilt-y Pleasures

Good:

Sally Hansen Set the Stage

Better:

CND Sheer 24K Sparkle

Best:

Rococo Nail Apparel
Gold Leaf Lacquer

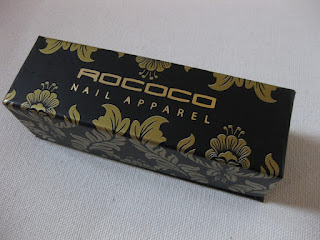
Over the last several months, every time I got a gold glitter or gold effect top coat, I liked it, but wished it was more like the gold leaf lacquer.  So I finally decided to just get the darned thing.  I blame Karen D.

Look:  even the packaging is sensational:


Pure, 24K gold leaf suspended in a quick dry top coat, beautifully boxed and presented.  What could be better?

How about some Tiffany Blue?

China Glaze For Audrey
with Rococo Gold Leaf Lacquer

If that doesn't spell luxury, I just don't know what does.

Sunday, September 25, 2011

Everything, all at once.

Whew!  Yesterday was a full day!

First thing in the morning, I stamped on top of Power Clutch.  I had it in my mind that I wanted to use a feather design in gold, so I got out my Konad plate m77 and China Glaze Passion:


Here's the picture I took in the morning, with
well-conditioned cuticles . . .

And here's one I took in the car in the early
evening after sitting in the sun all afternoon.
You can see the design better, but my cuticles are all
dried out, gah!

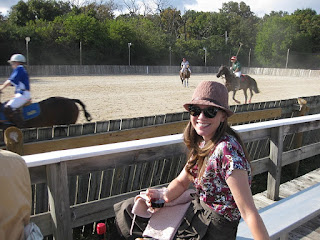
After that, Hubby and I got in the car and drove WAY out in the country to go to our first ever polo match!  We have a friend who plays and he invited us to come watch. It had been raining in the morning, but we got lucky and had a warm, sunny afternoon:


And I wore my new silk Sencha, which I finished on Thursday:

Here's the picture Hubby took.

And here's one my friend took.  She thought I should
have a picture with the horses in the background.

I am so in love with this top!  It is pretty and silky and comfy. AND it stayed pretty fresh all day long.  My cotton one wrinkled terribly, especially under the arms, but this one only got a few wrinkles on the back, due to sitting in the car for so long. There may be another one in my future, if I can find another print at Vogue that I like.

I originally thought that I wouldn't like this version as much as the first version I made - this one does not have tucks at the neck.  But I do like it, and having four fewer tucks to do made sewing it a little easier.  But boy, that silk was slippery!  I went really slowly, and did all the finishing by hand like I did on my first one.


When I got to the point of sewing the snaps on the back, I felt like it was a little plain, so I sewed the outer snaps all the way through the fabric to give it a little decoration:


I like how it looks, and it made the snaps more stable as well.  So, Sencha win!

After the polo, we drove back to the city to go to one of the concerts of the Hyde Park Jazz Festival, held on the beautiful University of Chicago campus.  Our friends drove down too and met us there, and afterwards, we all went to Medici for dinner. This is a recent find for us, and I'm happy to have found it.  This place has some of the best pizza I've found in Chicago.  In a city known for its pizza, I've had a hard time finding pies I like.  But then, I'm a pizza snob.

Whew!  Like I said, a full day!  We're thinking of maybe heading back to the Jazz Fest today . . .

Saturday, September 24, 2011

Power Clutch

Somehow this name strikes me as automotive.  Maybe because I've driven a stick shift for the last 25 years.  And the color looks like some fluid that would be drained from a car:

Essie Power Clutch

My internal jury is still out on this one, but it's not looking good . . .  It probably needs some stamping.

I thought I'd share a sneaky little trick I use.  I don't do this all the time, but sometimes when I'm using dark colors it helps with the clean-up.

My thumb nail on my right hand tends to stay pretty short, so that when I'm painting my nails, I get polish on the tip of my thumb.  That's not too difficult to clean up with a brush and remover when I use light colors.  But because that skin also tends to be rougher than on my other fingers, dark colors are harder to clean up - they often stain.  So I do this:


It's called a disposable nail form, and I have no idea how it's actually supposed to be used (never having had acrylic nails applied) but it allows me to just paint off the end of my nail and not worry about getting polish on the tip of my thumb.

I stick it on, kind of jamming it under my nail as far as I can:


And when I'm all done and my polish is dry, I just peel it off!  I got a roll of 500 of these at Sally years ago - needless to say, one roll lasts a long time.

There's just one caveat.  It's pretty sticky, so make sure it doesn't stick to your open bottle of nail polish and cause you to fling it, getting (dark) nail polish everywhere.

Ask me how I know.

Friday, September 23, 2011

Torn

Between wanting to show all six of the new fall Essie colors, and not really wanting to wear either of the remaining two at the moment.

Resolved by topping Glamour Purse with CND Crimson Sparkle:


It was a little too brown for my current mood, but the crimson livened it up.  Quite hard to capture though:


Trust me when I say it really does add a crimson sparkliness to any color you layer it on, without changing the color too much.

Thursday, September 22, 2011

Completed

The Violet blouse:


The Good:

One of the reasons I let this sit for a while before making it was that I couldn't decide which side of the fabric to use.  I finally decided to use the wrong side, since I had originally wanted to make this in Swiss dot, but couldn't find any.  I'm glad I did - I think it's much more interesting:


I'm also glad I decided to use piping around the collar and down the button placket. I think the lines of the design would have gotten lost without it in this fabric:


And I'm happy with the job I did on the piping.  It really wasn't that much extra work.


I learned a useful new trick too with this pattern:  when you need to turn something under 1/4" and press, it's easier to do this by first stitching along the edge 1/4" - the needle holes in the fabric make it easier to turn, and you can see exactly where you need to turn it!  This is especially helpful on curved edges.  You can remove the stitches later if you want to, but in this case I didn't, since it was on the inside of the garment at the edges of the facing.


The Bad:

Well, I think this style might be a little "cute" for me.  I keep forgetting I'm pushing 50.  Also, the fit is a little more constricting than I like across the back when I put my arms forward.

And no matter how much I try to iron it, and in how many different ways, I just can't get the collar to lay down flat.  I think it's probably due to user error, not inherent in the design.

And The Ugly:

I did a pretty good job with the buttonholes, but on the bottom one (thankfully), my scissor slipped when I was cutting it open and cut through the stitches.  I had to stitch it back up by hand:


It doesn't show too much when the blouse is buttoned though.

The Final Verdict:

I don't think it's worthy of my green Ginger skirt, but it's wearable.  The pattern was marked as a beginner pattern, but I probably wouldn't recommend this as an early project for someone new to sewing, mostly because setting in sleeves can be a little tricky.  I've done it plenty of times before, but I had a little trouble with these sleeves; not really sure why.

I'm not sure if I'll make this one again, mostly because I think the style is probably a little too young for me.  Because the neckline is wide, I don't think it would look very good with another collar style.

Have you made the Violet blouse, or are you planning to?  What was your experience with it?

Wednesday, September 21, 2011

Purchased

Two yards of gorgeous silk twill:


I swear I just went in to Vogue to get some buttons for my Violet blouse.  But I figured I may as well check the silks while I was there, since I do want to make a silk Sencha.  I really wasn't expecting to see anything I liked, and indeed, all the bolts at the top of the pile were not to my taste.  But with a little digging, I came up with this lovely.  And at $5.99 a yard, I didn't feel like I could walk out without it.  I'm sure you agree it was the right thing to do.

The pattern is mid-sized, I'd say.  Here's a picture with my hand for size comparison:

Mmmmmm , , , silky

In all honesty, I didn't really believe it was silk - I mean, $5.99 a yard?  And it's so heavy!  And it sounded kind of like . . .  acetate.  But I liked it enough that I bought it anyway.  I have a skirt just that shade of powder blue, and another skirt and a pair of pants in the olive green, so it fits nicely in my wardrobe.  And remember these shoes?  Perfect!

When I got it home, I pulled a couple threads and did a burn test.  And guess what? It really is silk!  Unbelievable!

And by the way - here's a closer look at my nails:


Two coats of China Glaze Cheers to You and one coat of Sally Hansen Ice Queen.  I was pretty disappointed in Ice Queen - the bottle is jam packed full of glitter, but none of it wanted to come out and go on my nails, no matter how much I tried to load the brush!  I think it's going in the swap box.

Tuesday, September 20, 2011

Begun

Now that my Sencha blouse is finished, I've begun work on the Violet blouse.  I bought the fabric for this blouse together with the fabric for my green Ginger skirt, and intended to make them in succession, so I could wear them as an outfit.  But then the Sorbetto pattern came out, and I was a goner . . .

I spent part of a cloudy afternoon last week tracing out my pattern, a job made easier and more enjoyable by the use of Hubby's new desk in the office I redid for him for his birthday.  Thanks, Honey!

Sunday afternoon I got down to the task of cutting out my pieces:

Another cloudy, rainy day.

When I made my Sencha, I traced out my pieces and did my markings with tailor's chalk - the chunk kind.  Needless to day, my markings were thick and less than perfect.  So this time around I decided to use a little trick I learned in a sewing class long ago:  marking with a sliver of soap!


Worked like a charm, even against this white fabric.  I'm really not sure why I didn't do this on the Sencha.

The markings are faint, but clear enough to be able to cut out the pieces:


And of course, they wash right out when you're done!

Does anyone else use this trick?  I remember it being a real revelation to me when I learned it.

Monday, September 19, 2011

Worn

Saturday night we headed out to a concert and dinner with some friends, so I took the opportunity to wear my new Sencha blouse!  I got Hubby to snap a couple pix before we left, and of course I think I look like a dork, but at least you can see what the top looks like on the body:

Yes, I'm a school teacher.

I wore it with the Subway Stairs Skirt I bought from Anthropologie a couple years ago.  I loved the skirt, but could never figure out what to wear with it.  I think this blouse suits it beautifully.

What's that over there?

I did have a couple problems wearing the blouse.  Because the skirt sits  a little low on my waist, the blouse didn't want to stay tucked in.  I think one more snap at the bottom will fix that.  I also found that the snaps going up the back made it pretty uncomfortable to lean back on the chairs in the concert and restaurant.  I don't really see any way to fix this - buttons would be even worse.  I guess one must suffer for fashion . . .

Interestingly, I didn't have any discomfort at all from the neck.  In fact, the longer I wore it, the looser the neck seemed to be.  I think I just got used to it.  I really like the look of the high neck, so I'm glad it's not as bothersome as I'd thought it would be.

And before we left, I painted my nails RED to complement my outfit:

Zoya Sookie


Boy oh boy, do I love this color!  And application was so much easier thanks to the tip from Gerry and SoKnitPicky about doing the right hand first!  Thanks, girls!

Even despite the minor wardrobe malfunctions, I felt pretty in my new blouse, and I was even stopped by two different groups of ladies in the restaurant who wanted to compliment me on my ensemble!  I definitely want to make this blouse again, so I'm going to check my wardrobe and see what else I have that will go with this style.  I'd love to do one in silk . . .

Sunday, September 18, 2011

Lady Like

Polish number four from the Essie fall collection:

Essie Lady Like

This one surprised me.  Based on swatches I'd seen online and how it looked in the bottle, I thought it would much more pink, but it looks more mauve on me.  I really like it.  This was two coats.

Later, I added on one of my recent acquisitions, CND Sheer 24K Sparkle:

close

This is the effect that is part of CND's The Look Fall/Winter 2011.  I really love it - it is quite different from the Gold Sparkle.  The flecks are all golden and are different shapes and sizes:

closer

closest!

So pretty, even against a light color!  Can't wait to see it against something dark.

Saturday, September 17, 2011

Tea Time

I finally finished my Sencha blouse!  And I love it so much, I couldn't even wait to take modeled pictures.  I had to show it off right now!

front

back


The fabric is more of the $3 per yard cotton voile I bought at Vogue over the summer.  I bought 2 yards just because I liked the print, but didn't really have any idea what I'd do with it.  After thinking it over for a while, I decided to try it out with the Sencha.  It is quite sheer, and the print is (I think) very dark blue, almost black, with the lighter tones being more blue-grey.

I made version two, which has tucks at the neckline (I know they are hard to see in the photos).  This version is meant to button up the back, but when I got the thing assembled, I decided to do the closure with snaps instead, because I really liked how the pattern lined up at the back and didn't want to break the continuity.  It meant a lot more work, but I'm happy I did it that way.

I have to admit that I didn't make a muslin for this one, and I was sweating it for a while, but it turned out OK.  I had read that the neckline was uncomfortably tight, but I didn't really think this would apply to me; I have a pretty skinny neck.  But as I was sewing and trying it on, I started to get worried.  Once the thing was finished though, it was fine - whew!  It is a high neckline, but it works on me.  However, I would think that for anyone with a normal-sized neck, some adjustments would be necessary.

There is a fair amount of hand-sewing on this one, and I added even more.  The facings for the cap sleeves and button plackets are hand-stitched to the body, but I also hand-stitched the hem, just because I really like the hand-made, almost couture look of it.  (Am I kidding myself?)  Thankfully, I really enjoy hand stitching:

tiny little catch-stitching

There are a couple things I'd do differently next time - and I would like to do this one again.  I forgot all about finishing the seams until it was too late (duh) and had to go back and very carefully cut the exposed bits with my pinking shears.


And next time, I'll make my markings on the wrong side of the fabric (double duh) - the difference between the right and wrong sides of this one are so minute, I ended up making all my markings (in blue chalk, no less) on the right side.  That made it a lot more difficult to line things up for the tucks, and a couple of them are kind of wonky.  On this one I don't think it will show too much - this fabric is going to wrinkle like crazy within about a minute of putting on the blouse.

If any of you have made a Sencha, I'd be very interested to know how the neck worked for you.  I looked for references to it, but didn't come up with much other that the post I linked above.

Friday, September 16, 2011

Afraid of the Dark

I love dark, vampy nail polish colors.  I buy them often.  And yet, when I go to do my nails, I rarely choose them.

Why?  Because I'm afraid I won't apply them with a steady hand and will end up with darkened cuticles that won't come clean.

It's a self-fulfilling prophecy.

The other day I went to put this on:

Essie Carry On

The left hand went OK, as I'm right-handed.  But then I switched to doing the right hand, and the more I thought about being careful and not making a mess, the shakier my hand got!

I'm not going to show you my right hand.  Although, after clean-up, it wasn't that bad, really.  I'm trying to force myself to wear the dark colors more, because I love them, and I think I need to get over this fear.

A few hours after applying Carry On (the third of the polishes I've tried from Essie's fall collection), I made my "Pay It Forward" gifts (remember that?),  a fairly finger-intensive activity.  I was pretty sure I would mess the whole thing up, but this polish held up remarkably well.  I got just the teensiest bit of tip wear on my right index finger - that's all!

But the finish dulled a little, so I decided to do a little stamping on top, since I haven't done any stamping in a couple months.


So here is Essie Carry On stamped with China Glaze 2030 using Bundle Monster plate 222.

Scary, right?

Thursday, September 15, 2011

Current Knittings

Once my second Jan sweater was finished, I felt I could start my first fall knit.  I've been dying to start this for about a month, but made myself wait:


This is Betty, from the fall Rowan book (Rowan 50).  As soon as I started seeing previews of the book over the summer, I knew I wanted to make this sweater.  I just love it.  I have a feeling I'll probably end up making a velvet or tweed circle skirt to go along with it . . .

I'm making it in exactly the same colors as shown, and here's my start:


This is Rowan Pure Wool 4 Ply in Eau de Nil.  I really love working with this yarn.  It's not as soft next to the skin as the old 4 Ply Soft, but it is so springy to knit. The only thing I'm doing differently is to work it in the round up to the armhole, which is something I don't always do.  I think a lot of garments/fibers benefit from the sturdiness of a seam, but in this case it won't matter much, and it will make my life a little easier down the road.

My other new project is the piece I took to Turkey as my back-up knitting, in case I did end up finishing The Jan Sweater.  This is the piece from which the mean security lady took my nice bamboo needle.  I had an old teflon-coated needle in the same size at home, so I was able to pick it back up:


This one is called Adrift, and it's by Carol Feller.  I bought this pattern because I had these two balls of Malabrigo Lace sitting around that I wanted to do something with.  It's a lovely coral color called Molly. 

Here's a better look at what the finished product should look like:


Sort of a cap-sleeve vesty wrappy cardigany thing.  I've seen some lovely ones on Ravelry that have long sleeves, and it makes me wish I had three balls of this yarn instead of two.

Although my bust measures slightly larger than 30" (but not much), I'm making that size because the consensus seems to be that it runs a little large, probably due to the fabric stretching.  So I may get lucky and have enough to do some sleeves down to the elbow . . .